Custom GMRS Radio Install
Hailing frequencies open! Finally got my FCC license for a GMRS (General Mobile Radio Services) radio, making me legit now. Call sign is WRVD394. VD? Seriously? Oh well.
I’ve always enjoyed having a big ol’ honkin CB radio in my vehicle. My entire life. Big. Chrome. Knobs. Backlit dials and screens. Amplifiers (why, that’s highly illegal, Corey and Trevor). This time around I took the plunge into the GMRS world and when choosing a radio I wanted one that would not be out in the open. For a couple reasons. First and foremost, I’m tired boss. I’m tired of finding places to mount a big old radio someplace other than on my dash. I’ve had them under the dash. I’ve had them in a console area. I’ve had them mounted to the top of the ceiling. I’ve even permanently removed sun visors (who needs them when you have sunglasses?) in order to mount my CB radio in it’s place. Someplace where I can easily see all those gorgeous knobs and dials. Getting your radio installed in these positions usually involve some type of electronic/aesthetic fuckery to get the power and antenna wires routed without being noticed. Secondly, Since I’m getting a new radio, I might as well upgrade from CB and hit the next level – GMRS. Had a HAM radio years ago. Too amateurish for my likings. Wanted something a little more mainstream.
This time around, I wanted a professional (interpret: stock) looking installation. As previous installs, I did NOT want this on the dash. Too many lookers and sunshine. I also did not want it in my usual places. I wanted to keep the Laramie looking as stock as possible. Because, damn… it’s a fine looking interior as it is and I don’t want to cheapen it’s look. So that left me with getting a radio with all the controls on the mic, while the radio itself gets tucked away somewhere where it won’t be noticed. I decided on the driver’s side, under the dash, but on the side of the console. Easy place to mount the bracket as well as have the wires well hidden. I chose the Midland MXT275.

The mic, I wanted in a handy location. Before drilling into my dash to mount the mic holder, I chose to drive around for about a month in some temporary locations. Needed to see where I liked it and where I did’t. I was hoping to be able to just have it hanging from a visor hook or something. They have these mic holders on pull out strings that you can clip to anything. Didn’t like those too well. Eventually decided on the dash between the instrument cluster and the controls on the console. At first I thought I might get away with the self-adhesive 2-sided tape that accompanied the holder, but no. That El Paso Sun had the mic sitting on the floor every day. I did like the spot I had it, so I drilled a couple small pilot holes through the holder and dash and secured it there. Perfect.

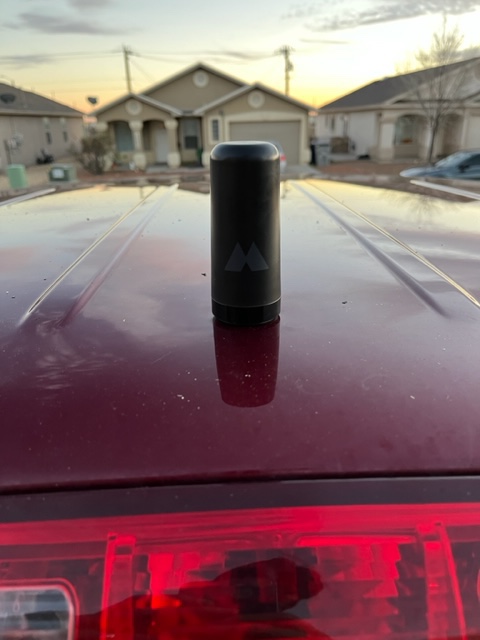
I installed the radio with included antenna early November. Came in real handy for our Thanksgiving and Winter camping trips. Also got a couple of new GMRS handhelds to go along with it that charges off USP port – real handy for charging while in the RV. The antenna I wanted (MXTA25) was not available but was on backorder due to the export/COVID issues in China. Eventually I was notified that it was back in stock in limited supplies. Ordered it along with a low profile antenna cable (MXTA24). Arrived just before our last trip but didn’t have the time to do a proper install. Instead, that provided me with enough time to think about where I wanted this new antenna. I had the included antenna already temporarily installed and attached via magnet. This new one could go on the roof. On the hood. On the bed rails.
I decided to mount it on the roof. Towards the back like the stock FM radio/satellite radio/GPS antenna, and centered. Ideally, I’d want it center mass on the roof, but I didn’t feel like removing the entire headliner to get there. Putting it 6 inches from the back, I still had easy access through the third brake light, and I could easily loosen the rear portion of the headliner inside to be able to work the cabling through. So there I was drilling a hole in my roof. Just enough for the RF connector to fit through. Gaskets were included in the mount. The Antenna screws down onto it. I included another gasket between the antenna and antenna cable just to be safe.