DC to DC Charger Install Part 1: The Truck

Standard waiver of responsibility applies: This is how I did it. I have over 38 years of experience in electronics. Your safety is your responsibility. Always seek professional guidance if you have any questions. Never guess when it comes to your life. Also, make sure your alternator is able to handle a 60 amp draw in addition to everything else it has to power.
This is part 1 of a 2-part series. Jump to Part 2 can be found here.
The conundrum: I mainly use solar on our 2015 ½ Lance Model 1995. But what if part of the (solar) system breaks down? Not unheard of. Or, more realistically, what if we have several days in a row with no sun and colder than expected temperatures during the day hours where not only do I have to run my furnace all night, but also during the day? During the day when instead of solar power being used almost solely to charge the battery, it’s now being used to run the furnace AND charge the battery. This will prevent my system from fully charging. A day or two of those types of conditions are no problem for me. But 4 or 5 days in a row? Now I’d start getting worried. Our power will generally go down about 20-25% per night in weather that hits the 20s overnight, with the furnace set at 64.
And that’s why I still drag my little WEN 2000 watt inverter generator whenever we go someplace for more than a couple nights. Backup power. And of course that also means I have to bring gas along too – just in case. Got a great deal on this generator in 2016 I think it was. Back when Amazon’s deal of the day really was something to write home about. Picked it up for around $299. Also.. back when they had next day delivery if you were Prime. Remember that shit? So does Pepperidge Farm.
I am now getting rid of that extra weight with the install of my 60 amp DC to DC battery charger from Renogy. Been planning this system for the last couple years and just started implementing it this year. Mainly because, to do it how I want to do it was going to take some work and patience. Two things I despise. Not really… the real reason is because it just wouldn’t have been practical until we went lithium with our batteries.
Lithium batteries, you see, are capable of handling a huge load when being charged compared to their lead-acid counterparts. Up to 100 amps in most cases. Try that with your lead acid battery. Long Stick Goes Boom, IFYKWIM.
My plan was simple. Use my truck engine as my generator. But that is kind of impractical if I am going to be running my truck for as long as I would be running my generator. Unnecessary wear and tear on the engine and a huge waste of gas. That is why I never implemented this plan before. But now that I have a 200AH Lithium battery, the narrative has changed.
With the common 2000 watt inverter generator, it’ll put a 20 amp charge on the battery. To charge an almost dead 200AH battery will take up to 10 hours with 20 amps. I would never let my battery get down that low, so lets say I wanted to bring my battery from 80% back up to full power. That would take about 2 hours for a 200AH battery to be charged with a 20 amp charge being applied. And that’s assuming you aren’t drawing a huge load in the meantime. That would drop the amps on the battery for charging purposes, prolonging the charge cycle.
Now lets figure in the ability to charge the same battery from 80% to 100% on a 60 amp charge. That would take about 40 minutes under the same conditions. And remember, I don’t need to charge it up to full. In an emergency, I’d need to just be sure to have at least 25% before heading to bed for the night. Now it becomes practical.
My plan is not to charge the RV battery off this charger while driving, but have this as a viable backup plan. While driving the battery is charged via solar and the standard 6-8 amps off the truck via the standard trailer connector. But no sun for 40 days and nights? I’ll just plug in the trailer to the truck and charge it off the 60 amp charger. The problem is that the standard trailer plug is not built to handle 60 amps. Now I have to build a dedicated trailer cable. One that can handle 60 amps of power. This will require some heavy duty wire. And with the length from the truck battery/alternator, we’re talking 4 gauge wire. That’s where this Part 1 comes in.
This install will place the DC to DC Charger inside the trailer, as close to the house battery as possible, as suggested by the charger’s manual. The truck side of the install is building an auxiliary cable that will extend from the engine compartment of the truck to the back bumper and terminate in a trailer connector that the trailer will be able to plug into in order to energize the charger. There are 101 ways to do this, and this is what I decided on. There are plenty of brands to choose from, all decent. I chose to stick with Renogy because I use their solar controller, solar panels, battery monitor, LiFe battery, and inverter. In other words, I’m a Renogy whore. Excellent quality. Excellent customer service. They have me for life as a dedicated customer until they do me wrong.
To review my solar and battery equipment, click here. There is a list at the bottom of that article if you don’t want to read the entire thing.
Parts list
- DC to DC convertor/charger (trailer)
- M10 copper terminal lugs with heat shrink (truck and trailer)
- SB120 (120 amp) connector kit (truck and trailer)
- Fuse holders (truck and trailer)
- Trailer connector with spring loaded door designed to hold SB120 connectors (truck) – warning… ships from Australia, takes a little more time than usual, and required hand-signed delivery
- Mating trailer connector with dust cap for SB120 connectors (trailer)
- Ultratite non-metallic flexible conduit, 25 feet
- 4 gauge wire 50 ft each, black and red (truck and trailer)
- 3/4” conduit anchors
- Protective wire wrap
- Self tapping screws
Other than the charger, conduit, anchors, protective wire wrap, and self-tapping screws, all items were purchased via Amazon. Out of these items, the charger was bought directly from Renogy and the rest from Lowes or Harbor Freight.
Procedure
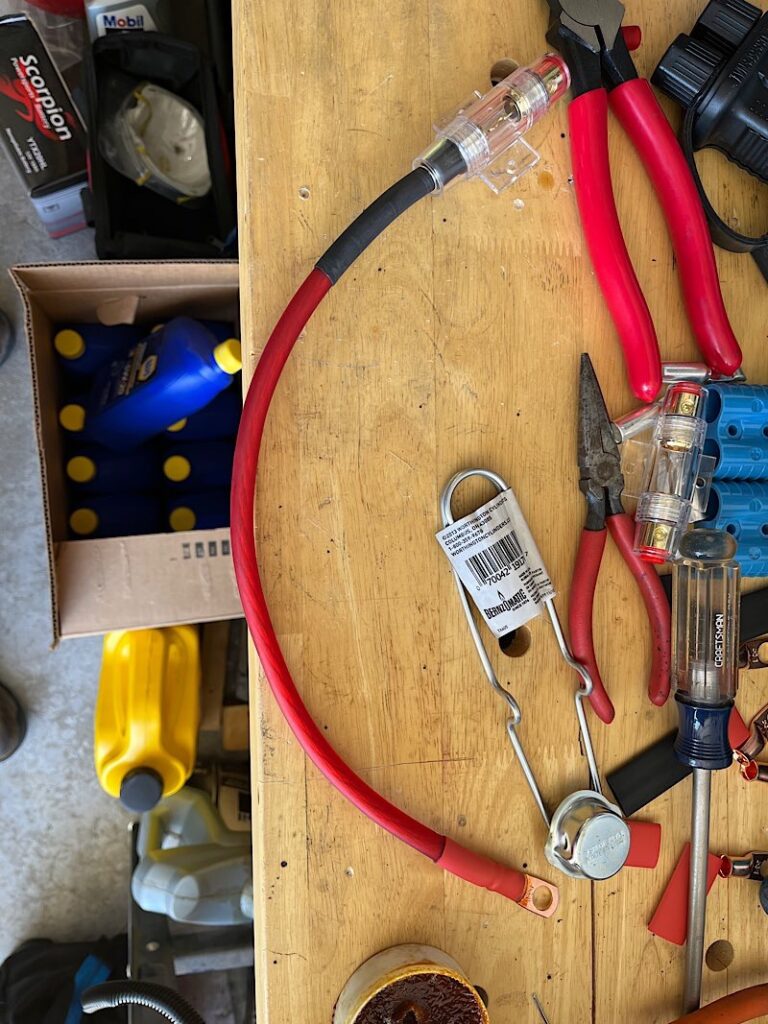
I used a torch to heat up the wells of the terminal lugs and pin connectors that were secured in a vice while melting rosin-filled solder into the wells prior to inserting the stripped 4 gauge wire into the well. After a few seconds you can let go, and then let it rest a few minutes. Protected the joints with shrink tubing, applying the required heat with a heat gun. Hydraulic crimping will also do the same job, I prefer solder so that if I make any mistake I won’t have to decrease the length of the wire. Simply reheat and pull apart, try again.
The charger manual suggests a 90 amp (or close) on the starter positive side. I used a 100 amp. The wires are secured into the fuse holder by your standard hex key screw. Again with shrink tubing at these joints. Mount/place the fuse holder in a manner that will protect it from jarring, elements, and heat generated by the engine.
I took my rubber conduit runner, starting from the rear bumper and literally installed it without any wires in it. I found a route that I was happy with that went from the back bumper, to over the spare/under the bed, through the rear driver-side wheel well, back down, and ran it up to the front along the side of the vehicle, avoiding the gas tank and any heat radiating components of the exhaust, up into the engine compartment, running between the battery and the driver side quarter panel. Once installed, I trimmed my comfortable excess – 2 feet worth. Making this entire run about 23 feet. I removed the conduit and headed back to the garage.
Happy with the length of my conduit, the hard part was fishing two 4-gauge wires through it. As suspected, they weren’t just going to slide through 23 feet of rubber conduit. I heatshrunk a standard air hose to my 50 feet of red wire. The air hose was sturdy enough to push through. Once it peaked out the other end I pulled it through, thereby pulling 23 feet of red wire behind it until the red wire was out. Then I duct-taped the black wire to the other end of the red, and pulled some more. It’s not as easy as it sounds. Hindsight tells me I should have used some super glide or something to assist that would lubricate but wouldn’t facilitate in breaking down the insulation over time. But through brute force at both ends (a pushing assistant) I was able to feed it through. On the engine compartment end I left enough tail to be able to plug into the negative of my battery and the the fuse holder coming off the positive side of the battery. The rear bumper end I left about a foot and a half of tail that would be used to mount the SB120 connector to, which would then be mounted inside the Trailer Vision holder.
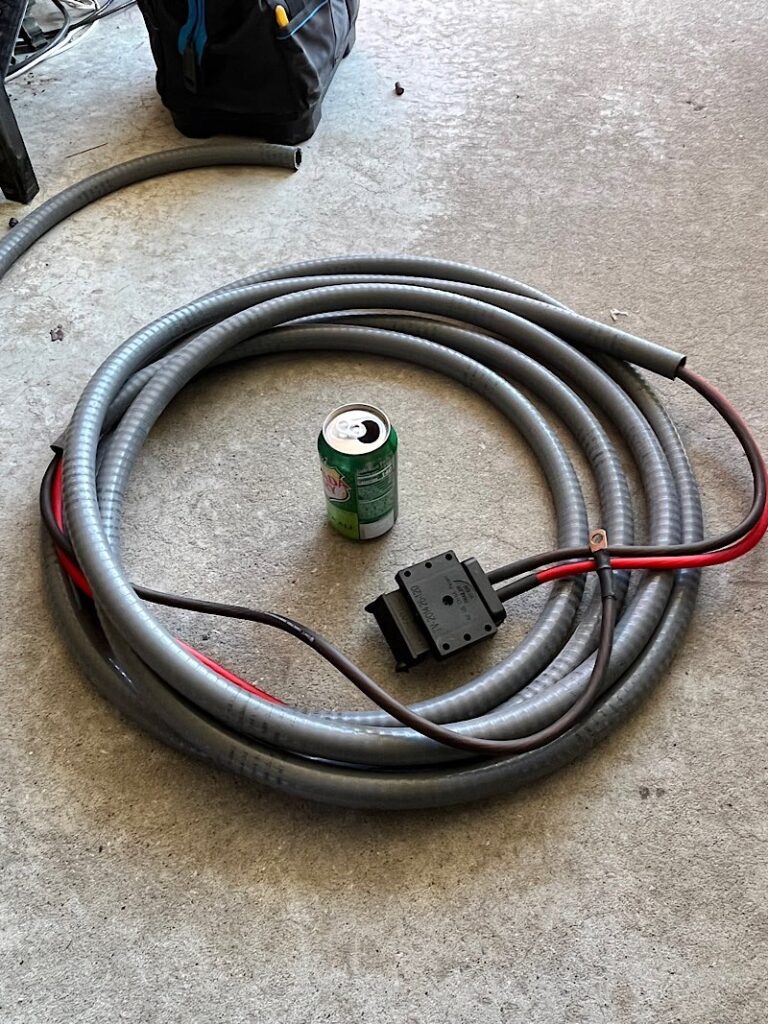
I squirted a bunch of silicone into the back of the trailer connector to protect from splashing water and let it cure overnight. The next day I ran the now filled conduit the same way. Beginning at the back and threading it through the wheel well, along the side, and up into the engine compartment. I used the self-tapping sheet metal screws to secure the conduit to the truck with the anchors. Self-tapping screws again to mount the trailer connector to the underside of the rear bumper. I also places some plastic tubing over the exposed 4-gauge wire for added protection from the elements.
Quite happy with how it turned out. See the video for the finished run from battery to trailer connector. I like to keep my site free from advertisements and tracking, so the link will take you to YouTube. I’m not looking for any thumbs ups or subscriptions. In fact, I’d rather you didn’t.