Posted
on September 3, 2024, 8:40 am,
by Walt,
under RV Repair.
Self Closing Door Catch
TLDR? This is your paragraph. Drill out the old rivets. Fill in holes with some type of sealant – I used regular old kitchen/bathroom silicone caulking. Mark your new pilot holes, drill and enlarge holes to fit your well nuts. Secure latch to the RV. You may want to bend the arm of the latch so that it is not resting on your RV wall when not being used. The bumper stopper that prevents the door from slamming open into your wall may need to be shortened to reduce stress on your wall when catch is being used. Links to parts are listed at the end.
The latch that holds the RV door open finally finished disintegrating. That cheap, white plastic that just crumbles after a couple years of being exposed to the elements. It did last longer than I thought it would. 9 years. I’m not complaining.
Disintegrating Door Catch
I chose a more sturdy catch for the replacement. Amazon link to it at the bottom.
Original catch was riveted to the door and wall. Thought I might get away with simply drilling out the old ones and putting in new rivets. Nope. Admittedly I am no rivet expert. Matter of fact, I have only used rivets once before and that was for the metal slide rails under the slide-out. Turns out the rivets I had were too small.
Drilled out the old rivets
A trip to Lowe’s gave me much larger aluminum rivets. Those worked but not really. Any heavy load and they began pulling out. Last ditch effort was to use some well nuts. I knew they would work. I used them to secure the solar panels to the roof and I had a fresh stock pile on hand to install the 4th and final solar panel. If I ever need any nuts or bolts that I can’t source locally, Bolt Depot is my go-to website. These worked perfectly.
Old holes sealed, well nuts inserted into new holes
Catch secured to the door
Arm secured and bent so that it doesn’t rest on wall
You may want to unscrew the rubber bumper that prevents the door from slamming open into your wall and make it a bit shorter. The shorter length of the new catch means the door will sit closer to your wall putting some pressure on that bumper. What’s really going on is that bumper is pushing the door open even harder, causing unnecessary stress on your RV wall and door.
Door stopper may need to be shortened
One more note – these well nuts provide a great seal, no need to seal more around IMO especially since they are on the side. If using them on my roof I’d throw some self-leveling sealant over them as a general precaution. If you feel better throwing a line of sealing around the edges, by all means seal that baby up.
Posted
on August 26, 2024, 10:58 am,
by Walt,
under Camping.
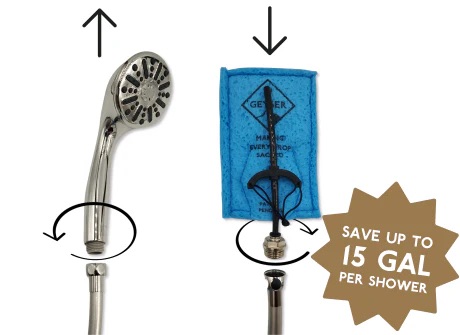
Geyser Systems RV Shower Wand Replacement (half kit)
I saw this replacement for an RV shower head called the Geyser Systems RV Shower Wand Replacement. Being an avid boondocking RV’er, I’m always looking for ways to extend my battery and water use and this system promises that you can get a full “shower” with .8 gallons of water. Naturally, I was intrigued. It reduces the water flow from the already water conserving shower head to an even more restricted flow using what appears to be low-flow landscaping tubes for soaking your shrubs or plants. Instead of pressurized water coming out of a shower head, the water comes out this small tube into a hollowed-out sponge. Clever idea. Something anyone with some DIY skills could create. But why re-create the wheel when someone already has one for about $40?
For my friends who camp in tents, you might want to check out their full shower system including water tank/pump/heater. That costs a little bit more.
First attempt to buy was met with a “not in stock” message. Boo. No way to be notified when back in stock. Double boo. My mind started thinking about what parts from Lowe’s could be bought to make one myself because this was an outstanding idea. And I could put my wife’s sewing skills to use by sewing a couple sponges together to mimicking the hollowed-out sponge.
I revisited the website today to learn that they are back in stock. Shew. No need to make one myself. Ordered. Most weekend and long weekend trips we don’t need to worry too much about conserving our water. Our 45-gallon fresh-water tank and existing Oxygenics RV shower head conserves enough water to not have to worry about this. But our annual over-a-week-long camping trip to Big Bend Ranch State Park requires us to either cut back on shower usage or make sure to bring along extra water and portable gray-water waste tank. We’ve gone both ways.
I’m looking forward to giving this a shot and writing my review here on my Corner. I’ll post pictures once it arrives but it won’t be until after our Big Bend trip before I put it to the test. You can expect to read about our experiences and thoughts on it at the end of the year or early next year.
Until 2021, both EP VAHCS and WBAMC shared connected facilities. Then WBAMC constructed their new hospital. That project was riddled with setbacks both in time and money. Construction began in 2013 with an expected completion date in 2017. But that completion date kept getting extended. Clocking in at $1.4 billion ($629 million over budget) it finally opened in 2021 and dubbed the most expensive hospital in the world by us locals.
It will be nice to have the emergency room of WBAMC co-located with the VA hospital once again. Not to mention just a little bit closer to my house. Question is, how long will it take and how much over budget? Currently the projected cost is just south of $617.5 million. I saw the model at the current VA hospital lat week. Assuming I’m still around, I’ll keep us up to date right here.
Tags: EP VAHCS, VA, WBAMC Comments Off on Epic Build Battle – WBAMC vs El Paso VAHCS
Posted
on August 18, 2024, 7:24 am,
by Walt,
under review.
They say we humans are born with two innate fears – falling and loud noises. All the rest are learned. I would offer there are three base fears. Add spiders to that list because I can’t recall when I first feared those eight-legged monsters. As long as I can remember that fear has been foremost in my mind. I remember riding in my grandfather’s red van with black spiderweb painted on the side and red shaggy carpet on the inside when a spider rappelled down from the ceiling on its string of web. I pointed it out to my grandpa and much to my horror he reached out, grabbed it, and stuffed it into my left-hand pocket of my pants. I screamed and tore those pants off. Looking back on that hazy childhood memory now, he probably didn’t really do that. That spider in my pocket was probably as real as the killer dog in his basement, the bear that chased us out of the woods that lined his country property, and the snipe we chased down in his back yard. But the fear was real.
Building on that common fear and stepping outside her collection of short stories, Splatterpunk Award Winner Bridget Nelson released her first Novella, Red Inside. The story follows a group of patients/nurses/doctors through what will end up being their last day on earth. Not everyone dies in the end, or do they? You’ll have to read it for yourself. She pulls from her previous career in the medical field and experience as an exotic pet owner to weave a web of horror that is sure to unsettle you. A fast-paced story for sure but will leave you wishing it took just a little bit longer to get there. I give it 8 out of 8 spider legs. Signed copies are available from her website and all the other array of formats on Amazon.
Posted
on August 17, 2024, 4:04 pm,
by Walt,
under Recipe.
Original Pizza Hut Sauce recipe on a napkin
The original Pizza Hut Pizza Sauce recipe has been left behind for posterity’s sake. On a napkin. Displayed in the Pizza Hut Museum. Vaguely.
To interpret with my own words in parenthesis:
2 onions
2 green peppers
1 celery
6-8 garlic buds
Grind freeze (put in a food processor or blender and process until a fine green sluice that can be frozen and saved for later)
Add:
salt
Pepper
Oregano
Add above (referring to the onion/pepper/garlic sluice)
2 #10 cans tomato (sauce)
#10 paste (tomato)
The vague part is the quantity of the salt/pepper/oregano.
Keeping in mind this recipe is enough to feed a literal restaurant, I needed to break this down into smaller, home-manageable chunks. So here is what I found useful for me. Feel free to adjust the salt/pepper/oregano to your likings.
Reducing the onion/bell pepper/garlic too small doesn’t provide good results in your blender, so I recommend halving that part. Use 1 onion, 1 green bell pepper, half a large celery stick, 5 garlic buds (what can I say, you can’t have enough garlic). Process to a fine green sluice then divide your sluice into 3 or 4 separate containers before freezing. Or maybe make “ice cubes” of them in a tray and figure out how many sluice cubes you need for a particular batch. For me, I divided into 3 equal parts and freeze.
My final recipe looks like this:
29 oz can tomato sauce
6 oz can tomato paste
1 serving of the sluice
1 tsp salt
2 tsp ground black pepper
2 tbsp oregano flakes
Mix all ingredients well, divide into however many portions you need and freeze any left over. This makes me about 8 small pizza’s worth of sauce. Suggest letting it sit in the fridge for a few hours or even overnight for best results.
Bonus recipe – Fairy Dust. I worked at a Pizza Hut in the 80s. There was this concoction of Parmesan cheese and oregano (equal parts by volume) in a shaker that was sprinkled onto every pizza.